Hot Cocoa Molten Lava Cakes + Toasted Marshmallow Ice Cream

hot cocoa molten lava cakes with toasted marshmallow ice cream // Glazed & Confused

What makes the perfect dessert? 

As much as I'd like to say that the love put into any homemade dessert is perfect in my eyes, I'm quite the dessert snob. When I crave dessert, I crave something special. Some people can get off on just eating processed cupcakes and those super-airy lofthouse cookies from their local supermarket bakery. Don't even get me started on those who are satisfied by the terrible cheaa ice cream that's pumped with more air than actual cream. Simply put, I'm not one of those people. Call me picky. 

hot cocoa molten lava cakes with toasted marshmallow ice cream // Glazed & Confused

For me, the perfect dessert needs to have lots of differentiating elements. Sure, sometimes simple desserts are crazy delicious, but that's not what I crave. (Don't be fooled, I'll gladly eat your simple desserts, too!) To get into my secret club of perfect desserts, a dish needs to meet the following requirements — it needs to be rich, but not too heavy. Sweet, but with a nice balance of flavors. A mixture of hot and cold is a must. Always gooey and always creamy. That's it.

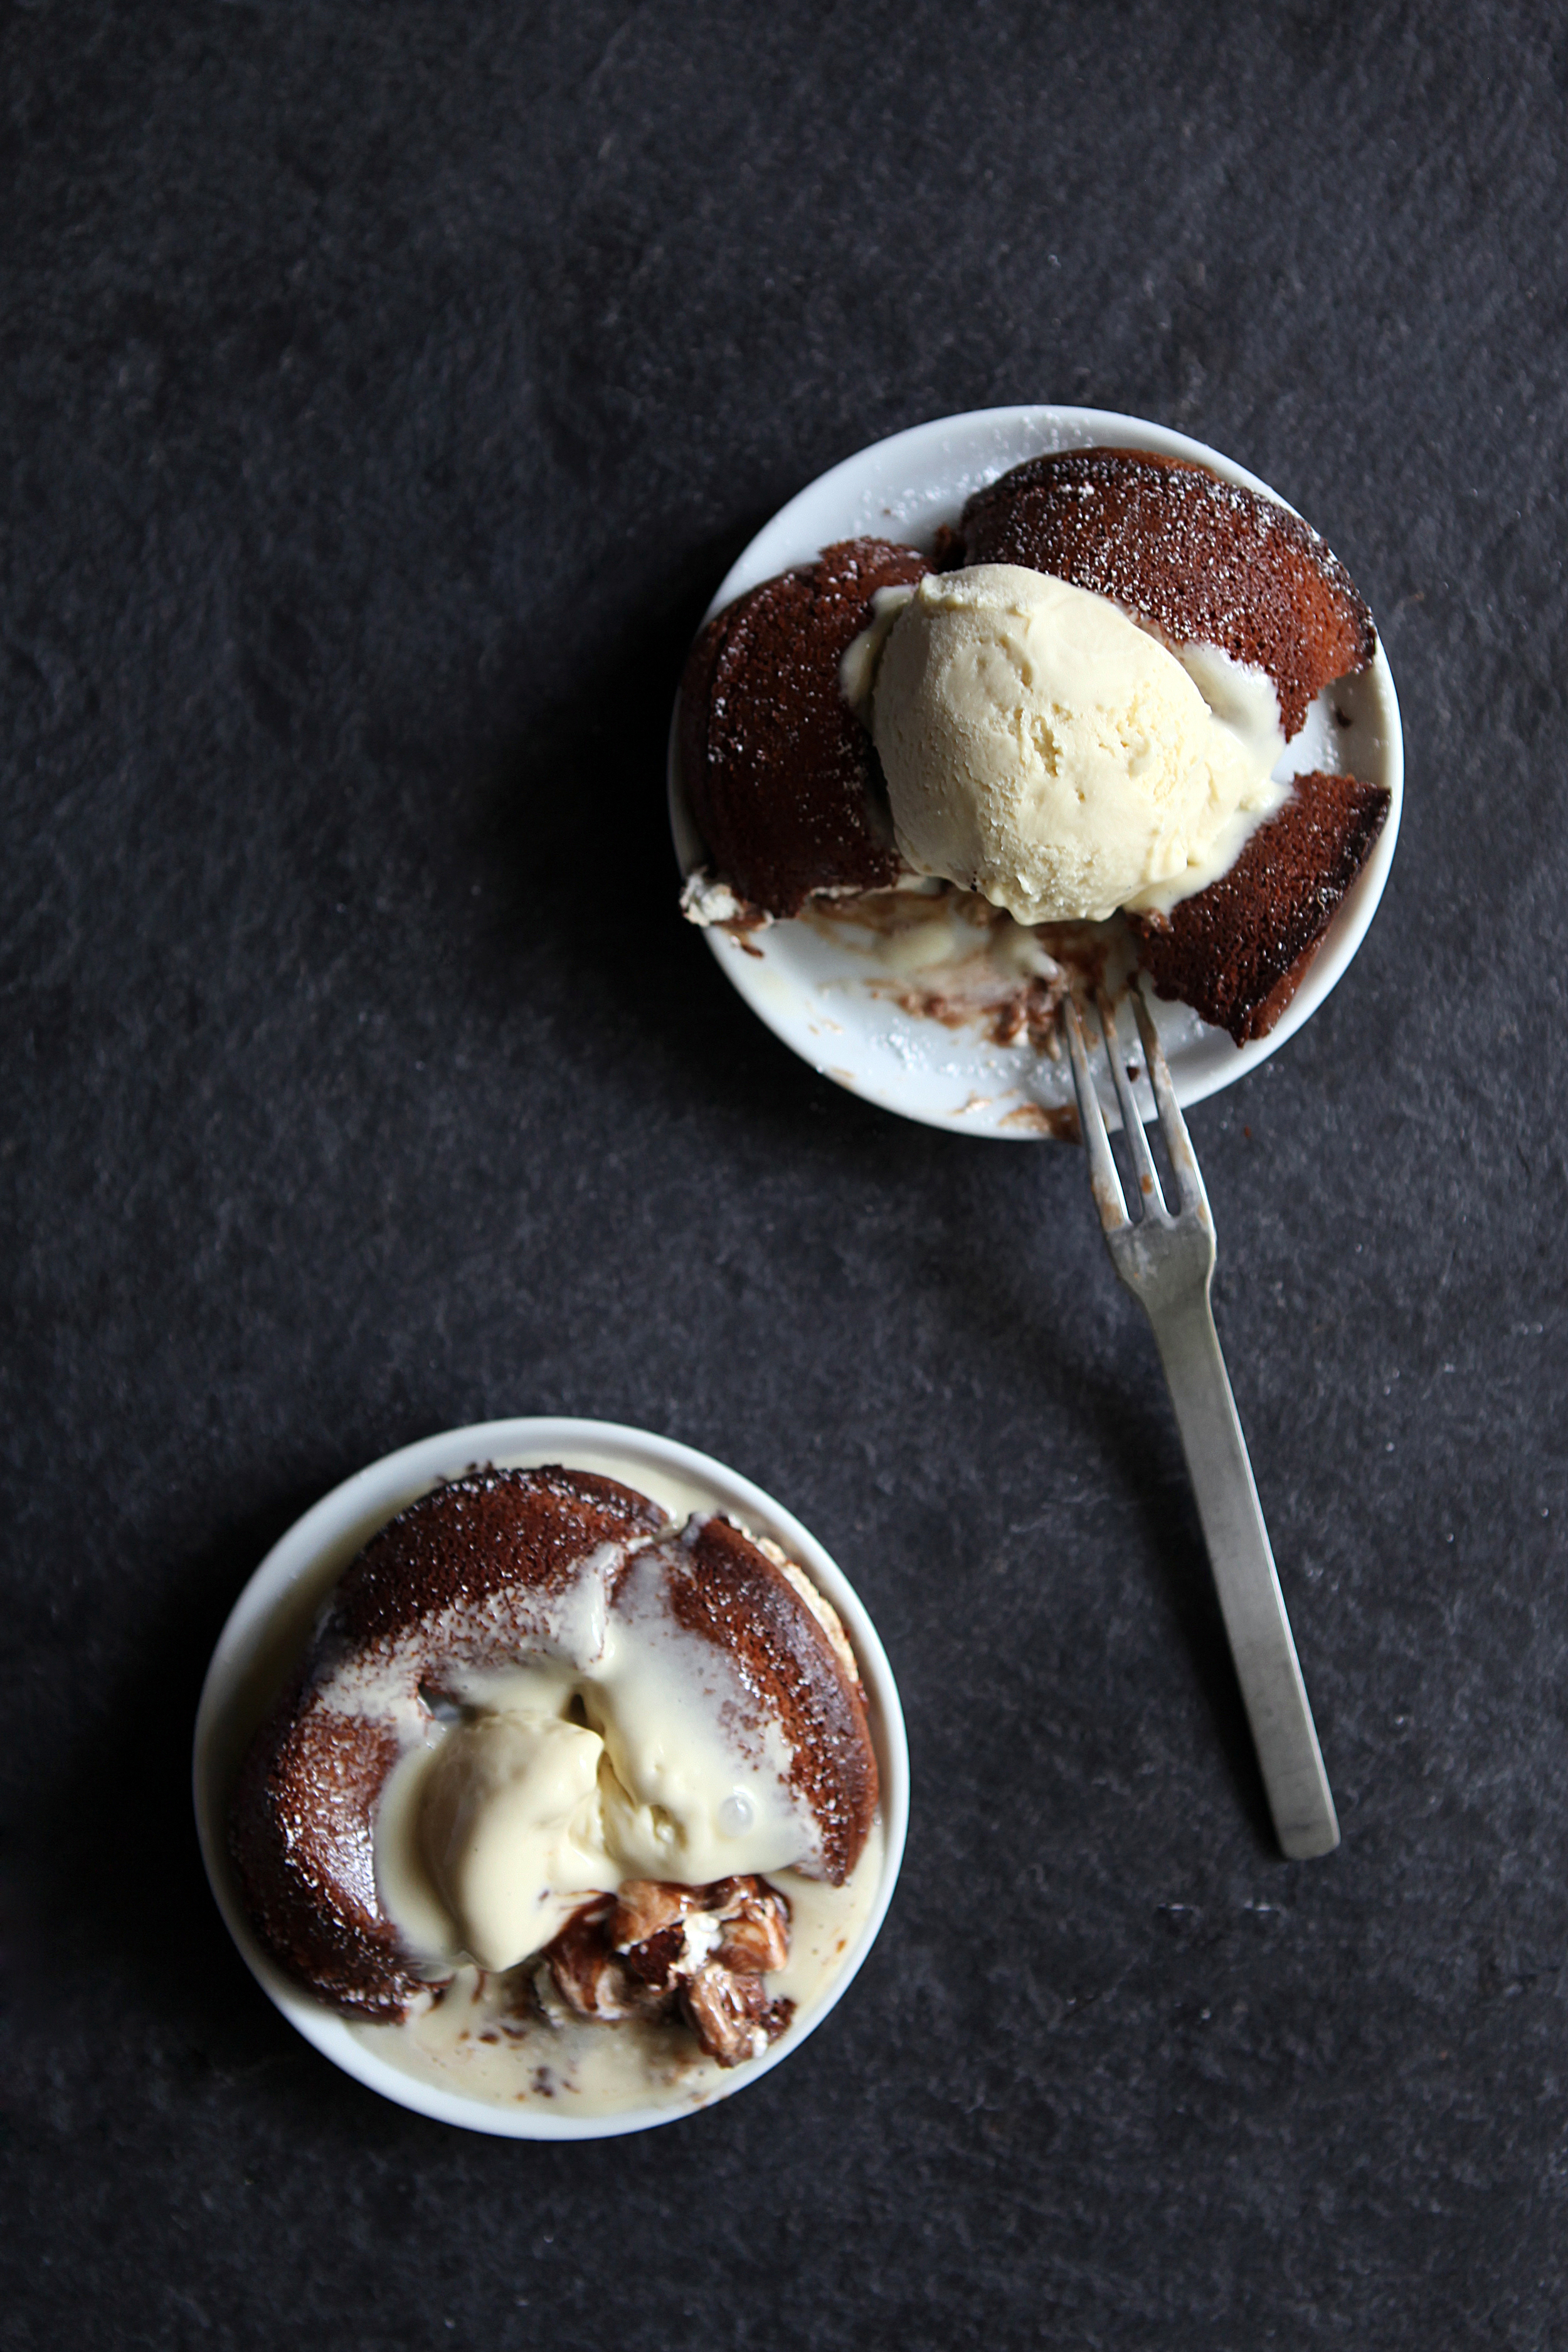
A few nights back, I decided that I had to create the dessert to end all cravings. After lots of tweaking, I emerged with a face full of chocolate and six little molten lava cakes just waiting to be penetrated. (I went there.) These aren't just any old chocolate fondants; I made them to taste just like hot cocoa. After unsuccessfully experimenting with baking whole marshmallows and later, marshmallow creme, into their centers, I decided on making a toasty marshmallow ice cream from scratch to top them off. So worth extra trouble and the "oh shit did I just cook my eggs with steaming hot milk?" 

hot cocoa molten lava cakes with toasted marshmallow ice cream // Glazed & Confused

These cakes are the perfect dessert indeed. And here's why: 

Rich: The chocolate content in this is totally through the roof. As much as I hate the word sinful for it's food-shaming quality, these are pretty damn sinful. 

Not-too-heavy: Despite the chocolate bomb, 

Sweet: Though most molten cakes are made with bittersweet or semisweet chocolates, the inclusion of Callebaut milk chocolate and hot cocoa powder makes these cakes perfectly sweet. 

..... but balanced: You might be thinking that's too sweet, but think again! I went to TOWN blowtorching my marshmallows for my ice cream. Seriously, give a Graham a blow torch and he'll make sure things are all kinds of toasted. The slight char of the 'mallows adds a smokey quality that really compliments the sweetness of the lava cakes. 

Hot,: It's served immediately out of a 425 degree oven.... 

yet simultaneously Cold: ....and then I throw a big ole scoop of homemade ice cream on top. 

Gooey: A single swipe of a knife through the center results in a giant pool of gooey uncooked chocolate billowing out from the cake's center. 

Creamy: The custard base of the ice cream is extra-thick and creamy. You don't know euphoria until you've experienced ice cream rapidly melting onto a river of hot chocolate. That's what's up! 

hot cocoa molten lava cakes with toasted marshmallow ice cream // Glazed & Confused

In other news: getting my posts via email if finally a thing! Subscribe with your email address through the form in my sidebar and your inbox will get instantaneously so much sweeter. 


Hot Chocolate Molten Cakes 

  • 8 oz. milk chocolate
  • 10 tablespoons unsalted butter
  • 1/2 cup flour
  • 1 1/2 cups confectioners' sugar, sifted
  • 3 whole eggs + 3 egg yolks 
  • 1 tsp. vanilla extract
  • 3 0.7-oz. packages instant hot cocoa powder 

Preheat oven to 425 F and grease six 6 oz. custard cups. 

In medium bowl over a pan of simmering water, melt together the chocolate and butter until combined. Once thoroughly mixed, remove from heat. Stir in the flour and sugar. Mix in the eggs and the yolks and whisk until smooth. Fold in the vanilla and instant hot cocoa powder. 

Divide the batter into the prepared cups and bake for 12 minutes. The edges of the cake will be cooked, but the middle may look a bit runny. Remove from cups and serve immediately with ice cream. 

Toasted Marshmallow Ice Cream 

(adapted from this

  • 5 large egg yolks
  • 2 cups (470 ml) whole milk
  • 1 cup (235 ml) heavy cream
  • 1 teaspoon vanilla extract
  • 1/3 cup (66 grams) sugar
  • Pinch of salt
  • 9 ounces (200 grams) marshmallows 

Instructions

  1. To make the custard base, combine the whole milk and sugar in a saucepan over medium high heat. Heat the mixture until steaming and bubbles appear at the edges, do not boil. Meanwhile, whisk together the egg yolks in a large bowl. Slowly add the heated milk mixture to the egg yolks while whisking constantly. Pour the mixture back into the saucepan and cook over medium heat until thickened and coats the back of a spoon, stirring frequently. Pour mixture through a mesh strainer into a large bowl. Add the heavy cream, vanilla extract, and salt. Set aside.
  2. Spread the marshmallows out on a sheet pan lined with parchment paper or a silpat. Toast the marshmallows with a kitchen torch or an oven broiler. If you use a broiler, place the oven rack as high as possible and watch the marshmallows very closely to ensure they don't burn. Rotate the marshmallows so that they are evenly toasted on each side. 
  3. In a blender, add the custard mixture and the toasted marshmallows and puree until smooth. Chill completely in the fridge. Freeze in an ice cream machine according to the manufacturer's instructions. Let harden in the freezer for an addition few hours before serving.

Satsuma Dark Chocolate Tart

Dark Chocolate Satsuma Tart with Gingersnap Crust // Glazed & Confused

So it's November? It seems like just yesterday I was making my yearly list of resolutions and all that jazz and BAM — we're back in the holidays! Now that Halloween is out of the way, we can focus on Christmas. And trust me, I've been feeling the Christmas spirit for weeks now. (#MariahCarey) Yeah, I know I'm just a little bit premature, but Christmas is my favorite thing ever and we all know that Thanksgiving is just Christmas Lite, so I will listen to all of the Destiny's Child Christmas I want. 

Dark Chocolate Satsuma Tart with Gingersnap Crust // Glazed & Confused

Alas, y'all probably all think I'm crazy for pulling out the peppermint extract this early, so I'll give into November-ness for now. (Three weeks from now, that'll be a different story. You've been warned.) Aside from Thanksgiving and all of pre-Christmas hype, November is pretty damn great. The nights are darker, the air is considerably colder, I can wear scarves and coats without sweating to death. 

Here in Louisiana, November is also pretty damn great considering that the local satsuma trees are bursting with fruits just reaching maximum deliciousness. In case you're unfamiliar with satsumas, they're a deliciously petite citrus with an easy peel, much like a tangerine. Satsumas are native to Japan, but have made their way stateside via California and the Gulf Coast. 

Dark Chocolate Satsuma Tart with Gingersnap Crust // Glazed & Confused

Though they've got pretty great snacking potential, satsumas are perfect for baking. Last year, I made a satsuma yogurt cake that's as simple as it is delicious. This year, I wanted to try something a little bit different. After juggling between a few crazy options, I settled on a classic chocolate tart, but infused it with Bayou Rum's new satsuma blend and ensured that there would be plenty of zest action going on. Encased in a gingersnap crust and topped with a satsuma and black pepper whipped cream, this tart is perfectly balanced between rich and chocolatey, and sweet and well, tart. 

Dark Chocolate Satsuma Tart with Gingersnap Crust // Glazed & Confused

Satsuma Dark Chocolate Tart

(recipe adapted from smitten kitchen)

for the gingersnap crust: 

  • 8 ounces gingersnap cookies, processed into fine crumbs 
  • 1/2 stick unsalted butter, melted

for the chocolate filling:

  • 12 oz. bittersweet chocolate, chopped into chunks
  • 1 cup heavy cream 
  • 2 large egg yolks
  • 1 large egg
  • 1/4 cup sugar 
  • 1 tablespoon all purpose flour
  • 1/8 tsp. black pepper
  • pinch of salt
  • 1/4 tsp. cinnamon 
  • 2 tsp. satsuma zest
  • 3 tablespoons Bayou satsuma rum 

for the satsuma whipped cream: 

  • 1 cup heavy cream
  • 2 satsumas, juiced and zested
  • 1/2 tsp. vanilla extract
  • pinch of black pepper
  • sugar, to taste

Directions: 

In a medium bowl, combine the melted butter and crushed gingersnaps well. Press the crust mixture into the bottom and sides of the tart pan. Set aside.

In a saucepan, cook the chocolate and heavy cream over low heat. Once the chocolate hasmelted and combined to form a ganache, remove from heat. In a separate bowl, whisk together the eggs, sugar, flour, pepper, salt, and cinnamon until combined. Gradually add the chocolate mixture, whisking to ensure that the eggs won't cook. Once the chocolate mixture is fully combined with the egg mixture, add the satsuma zest and rum. Pour filling into the prepared crust and bake for 30 minutes at 325. Once done, remove from the oven, cool in the pan for 20 minutes, then remove from the tart pan and serve at room temperature. 

To make the whipped cream, combine all ingredients and mix until soft peaks form. 

Homemade Butterfinger BB's

Homemade Butterfinger BB's // Glazed & Confused

RING THE NEW SERIES ALARM!

You read that right, I'm launching a new recipe series that I'm super super excited about. I've been crazy inspired by junk food and my childhood lately. Growing up in the late 90s and early 2000s was the shit. I know that a lot of my peers whine about being born in the "wrong era," but I wouldn't trade my birth year for anything. (Seriously, how pretentious is that? #eyeroll) 

I could go on and on about my weird obsession with B*Witched or tell you every single HitClips single I had, but let's talk about the food real quick. I was quite the poster child for childhood obesity, so after school snacks were my life. I'd do anything to go back to a time where I could come home from my totally strenuous day of elementary school, grab a s'mores Chewy bar and a Pepsi Blue, and turn on TRL without feeling overwhelmed with guilt. You know, if TRL and Pepsi Blue were still around. I guess some things just have to change. 

Graham's Lunchbox is a new series that will explore, remake, and re-imagine all of my favorite childhood foods. The processed junk of my childhood far outweighs the snacks inhabiting the lunchboxes of schoolchildren nationwide today. Sure, Pumpkin Spice Oreos are hella delicious, but they don't have anything on Dunkaroos. Those fancy eighty-million-percent dark chocolate bars that I indulge in from time to time pale in comparison to the pure joy that was cracking open a Wonderball at age 8. And don't even get me started on Crispy M&M's. 

Homemade Butterfinger BB's // Glazed & Confused

Speaking of candy, did you guys know that you can make Butterfingers at home with only THREE ingredients? Don't ask me how it all works (although my personal theory is that it's some kind of sorcery via the candy gods), but equal parts melted candy corn and creamy peanut butter yields a glorious substance that is freakishly similar to an actual Butterfinger candy bar. I've seen the recipe on Pinterest for years, but never really thought much of it until it dawned on me that I could make my own version of my favorite childhood candy at home. So I did it. 

Yes, Graham Blackall just singlehandedly revived America's most-amazing-but-too-often-forgotten candy of yesteryear: the Butterfinger BB. Please hold your applause. 

It's recently come to my attention that some very unfortunate souls do not remember that sugary flawlessness that was the Butterfinger BB. Let me educate you. First introduced in 1996, Butterfinger BB's were essentially just little circular bits of your typical Butterfinger. They were delicious. (Much better than a regular Butterfinger even though they were the same thing.) I ate a lot of them. They had awesome commercials starring Bart Simpson. My life lost all purpose and became completely devoid of joy when they were discontinued in 2006. Nestle sort of revived them in 2009 in the form of Butterfinger Bites, but they're totally not the same thing. In 2014, I made them a thing again and it was glorious. 

The result? Instant throwback. It's actually kind of scary how good these are. I've been keeping them in the freezer and it's definitely been one of those situations where every single time I walk past my kitchen I have to restrain myself from getting one. and I'm failing. Miserably. (quelle surprise!) 

Homemade Butterfinger BB's // Glazed & Confused

Homemade Butterfinger BB's

  • 16 oz. creamy peanut butter
  • 16 oz. candy corn
  • melted semisweet chocolate for dipping 

In a medium bowl, microwave the peanut butter and candy corn for 1 minute. Stir the mixture to combine. Continue microwaving in 30 second bursts until the mixture is fully combined. Using a teaspoon, scoop the mixture and roll into balls. Place the bb's on a parchment-lined baking sheet and freeze. Once hardened, remove from freezer and dip into melted chocolate. Return the balls to the freezer to set the chocolate.